Author Topic: [GUIDE] Baking glowmaps in Blender  (Read 12837 times)

0 Members and 1 Guest are viewing this topic.

Offline The Dagger

  • 29
  • I like zod ships
[GUIDE] Baking glowmaps in Blender
Since Betrayal has requested me a simple guide to bake glowmaps in Blender, here's it is.
Disclaimer:
The objective of this guide is to give the community a simple step-by-step introduction on baking glowmaps. It is a reflection of my own workflow, which is probably not the most optimized one in the blender universe but I can assure you that they do work. This is not a modeling guide, so you'll need a correctly UVmapped model. If you have any doubts or problems, please feel free to point them out.


Introduction:
Why baking glows?

The physics of lighting are pretty complicate. Once emitted, a light beam will travel in straight lines, bouncing from one object to another while been partially absorbed. All objects receiving light become lightsources in turn. No game engine or hardware is able to duplicate this behaviour in real time currently. And you'll subconsciently notice that there's something funny going on on your image...

However, the problem can be tackled pretty effectively if all objects are static. In this case, we can use a rendering program and compute the effect of light on the scene (a process that can take a long time), store the information in an image and just use the image in our engine. That's basically what glow baking is all about. If the geometry of your ship is static (no rotating bits, sorry!) and if lights are static (sorry, no blinking lights!) then you should bake some glows.

Also, baked glows look good. It gives your model a more accomplished look. They work best in low light situations and specially good with shadows enabled. Enough words and let's go to an image:


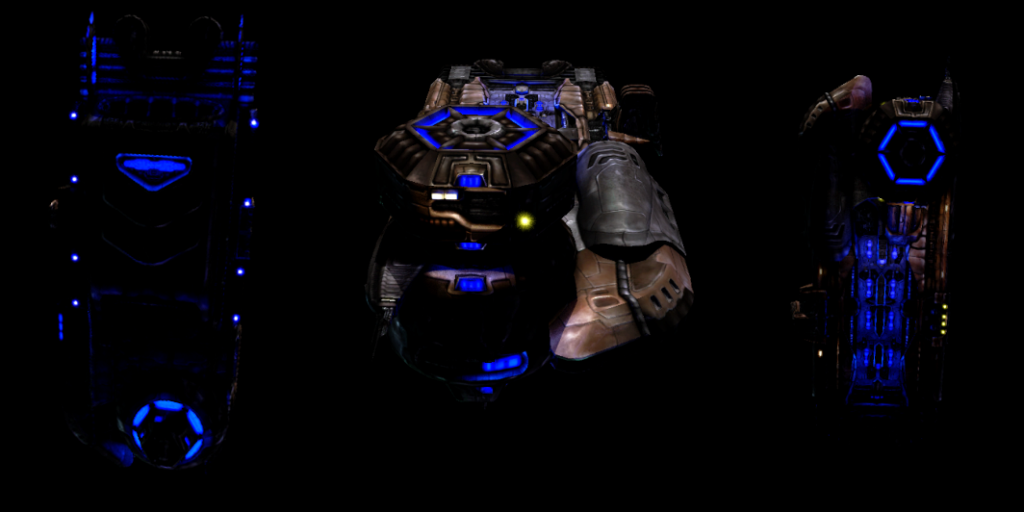
Can you see how that white light in the front lights things around it? Can you see how the blue light bleed out? Isn't that awesome?!  :nod:

The works

Blender has two rendering engines that we can use for this: Blender Internal (BI) and Cycles. BI has two ways of calculating lights, an approximate method and raytracing. This gives us three baking methods, each with a particular setup, that we will be exploring next:

- BI: approximate method: the cheap and dirty way
- BI: raytracing method: earning your bake
- Cycles: getting into the experimental stuff

What I do in general is to bake lights grouped by color and maybe intensity. If you bake different lights groups into different files, you can integrate them into a single image and control their relative intensity later. We'll be exploring that too at the end of this guide.

- Integration and final touches

What method to choose?

I will be using the GVB Hathor as an example throughout this guide. You can see the model here. We will be baking only the green lights into a 2048x2048 map in white (we will address color in the last step). Here's a comparison of the results we will obtain with each method, though the general light intensity is a bit heterogeneous:


What stands out:
1- The approximate method is unable to do any shadowcasting. this means that areas that should be completely black are lighted because they are facing some light. You can see that the green things in the pods are actually lighting the inside of the cockpit! In this case, the comparison is a bit harsh, but with a less complex model, the result might just be enough. It is really easy to set up. Also, baking this took me less than 1 min (using the GPU, Blender can use CUDA (sorry AMD users!)). If your machine is getting old, you might want to avoid the other methods since they are quite heavy and your pretty much stuck with this.

2- The raytracing method works fine but it is cumbersome to use. You have to use lights in order to cast shadows, and you have to put them in place manually. That takes a lot of time, but I have a bit of a workaround. The problem with this method is that only lights affect lighting. That means that light won't bounce from one surface to another, and it'll give relatively sharp shadows. Rendering this took me about 30 min.

3- Cycles is the new rendering engine in Blender and it has been in development roughly for two years. Cycles baking is a new feature, and you'll need to grab a Blender nightly. Being a new thing, it has some issues. For example I wasn't able to get it to run on the GPU, and my final render took about 3 hours. The problem of bouncing light from one place to another is that calculations cost time and might give grainy results, but there are some ways to work around the problems. On the plus side, you get shadows and indirect lighting from every face. It's just so beautiful.
« Last Edit: May 10, 2014, 04:56:24 pm by The Dagger »


Offline The Dagger

  • 29
  • I like zod ships
Re: [GUIDE] Baking glowmaps in Blender
Baking glowmaps with Blender Internal and the approximate method: the cheap and dirty way

The configuration for this is pretty easy.

First you'll need to prevent ambient light to ruin your bake! Go to the world configuration, uncheck ambient occlusion, uncheck environmental lights and check indirect lighting with a factor of 1 and also 1 bounce. Your world configuration should look like this:


Then go to the material settings, and create a new material. I'll call it "Material". Apply your material to the model. Set Diffuse Color to (0.8,0.8,0.8) and Intensity to 1 and specular Intensity to 0.  Into Shading, set the Emit to 2. Here's where you'll set the light intensity, use it wisely. It should look like this:


Next, you'll need a texture to define the parts of the image that actually glow. Set the glowing parts to white and the rest to black (you can use any resolution you like). Mine is 4096x4096. You'll have to configure it to multiply the emission value and check RGB to Intensity. Don't forget to set mapping to UV!


Now, go to the UV editor and create a new image for your bake. Mine is 2048x2048. Finally, you'll have to select your model, go into edit mode and select all faces. Now select your bake image in the UV editor and everything is set.


Now exit the Edit mode and go to the Bake tab. Set bake to Full render, and check that Clear case.


Now hit that Bake button! Once the process is over, save your image and you're set. Wasn't that easy? Here's the result:


Now you're ready to go to the final step.
« Last Edit: May 10, 2014, 04:57:35 pm by The Dagger »


Offline The Dagger

  • 29
  • I like zod ships
Re: [GUIDE] Baking glowmaps in Blender
Baking glowmaps wth Blender Internal and the raytracing method: earning your bake.

Here's the problem: you have to use lamp objects in order to have shadows in Blender Internal. For example, you can put area lights close to the emitting faces. AFAIK this is how the Arcadia model glows were baked. This is tedious as hell and not very well adapted for curvy surfaces. Instead what I do is to create a auxiliary mesh (a light rig) using parts of the model and use it to set up the lights.

First, you'll need to duplicate your base model or just copy the important parts. Then, delete anything that doesn't emit light. The knife tool is your friend here. You don't need to much precission on this part. Once you're done, divide faces manually as necessary to achieve a relatively homogeneous mesh density. Once done, use Alt+S to extrude your faces just a bit off (I use 0.1 units) from their original position along their normal. Finally, you can add a subdivision modifier (I use only 1 level of subdivision) to increase your mesh density at the cost of higher render times. My light rig looks like this:


Now for the magic part, add a new point lamp at the center (Shift+S -> Cursor to center -> Shift+A -> Lamp/Point). Set the rig as the lamp parent (Select the light -> Select your rig -> Ctrl + P -> Object (Keep transforms)). Go into the rig mesh properties and select Duplication to Faces. Your mesh should look like this:


If your lights are displaced, it's probably because your light rig or light has an off center object center or some translation not applied. Here you can see the lights over the original model:


Now that that's done, we'll have to configure things for rendering.
Get your model a simple material, only Diffusive Color (0.8, 0.8, 0.8), Diffusive Intensity 1, Specular Intensity 0, (unlike the first method, Emission should remain at 0). Remember to check those "Cast" and "Recieve" boxes in the shadows tab.


We don't want the light rig to interfere with any lights, so we'll make a fully transparent material for it:


You'll also need to set the light to cast shadows. The light intensity depends on the light rig mesh density, but is usually a very low value. I generally start at 0.05 and render a few images to get the value right (to render an image is a lot faster than a bake). The distance falloff is also an interesting tweak since it allows to have small local lights or lights affecting all the model.


I was forgetting to setup the good rendering options! Here's the world configuration needed:


Of course you need to have an image and to point the model UV to it as in the previous method. Once that is done, you can hit that bake button. Patience is a must here, my bakes take from 1 to 3 hours depending on the number of lights, the Samples value on the World/Gather configuration, and Sampling values on the Light/Shadows configuration. Low Shadow samplig values give grainy results but high values do not increase the shadow quality too much. If you want to test the overall configuration, a good strategy is to bake into a small map (I use 128x128 or 256x256). You won't see much detail but the overall intensity is there.
Don't forget to save the image to a file once you're done! The result should be like this:


Now you're ready to go to the final step.
« Last Edit: May 10, 2014, 06:14:20 pm by The Dagger »


Offline The Dagger

  • 29
  • I like zod ships
Re: [GUIDE] Baking glowmaps in Blender
Baking glowmaps with Cycles: getting into the experimental stuff.

Cycles has been a great breakthrough for Blender. However, it lacked baking capacities. Cycles baking was added to Blender trunk on May 2nd though there were experimental builds out there. Cycles uses shaders and nodes in order to specify materials. It also really easy to setup, though it is quite different than BI materials.

The default renderer in Blender is BI. In order to change it to Cycles, you have to select it on the top bar:


When you add a material in Cycles, and see it on the Node Editor, you should see this:


This is a simple diffusive material, but you can add new nodes with Ctrl+A and connect them as you may please. Actually, we can reproduce the configuration used when baking with BI-approximate here. You need to apply to your model a material that looks like this:


Here, the Hathor-GlowMask texture is deciding wether the surface is treated as a diffusive or emmisive material. An unlinked texture node with your baking target is required and all is set for baking. Here's the configuration you need:


Hit that bake button, go take a nap and don't forget to save your image. Hmm... it's seems too easy... and it might be if I could run this on my GPU. If you are fine with the time it takes to bake your image with this configuration, by all means, go ahead and use it. However, there are some tricks that can reduce rendering times.

[optional]
Cycles is a progressive renderer, calculating samples and compositing the resulting image along. With enough samples it'll produce nice photoreallistic images. However, under low light conditions, it generally needs a lot of samples to avoid a grainy result. Your render time is directly proportional to your number of samples and to your sample calculation time, and that's all we need to know.

So what can we do to reduce sample calculation time? In general cycles will calculate bouncing light rays from one surface to another for each sample it takes. The number of allowed bounces can be varied, but you need at least two bounces to catch that sweet indirect light we want. What we can do however is to bake the direct light and then use this image to speed up our glow bake. Since the first image is only used to feed the second one, we don't care if it's grainy, it only needs to capture the average lighting of the scene.

For this, you can use the same material as above, but I use only 1 diffuse bounce, 50 samples and a 1024x1024 image called "Light" as the target (bake time is directly proportional to the number of pixels in the image). The result is very grainy, but it doesn't matter. Once this is done, we apply this material to the model:


Then we rebake into a new image. I used a 4096x4096 with 2000 samples to reduce noise. Final baking is quite faster with this setup and quality is not compromised. Don't forget to save your image. Finally, reducing the image size in GIMP to 2048x2048 and a little gaussian blur helped reducing noise further.
[/optional]

My end result is this:


Now you're ready to go to the final step.
« Last Edit: May 11, 2014, 06:14:33 pm by The Dagger »


Offline The Dagger

  • 29
  • I like zod ships
Re: [GUIDE] Baking glowmaps in Blender
Integration and final touches

Well, if I remember correctly we wanted a green light over a model which isn't totally white. How'd we get that? The answer is some really simple GIMP (you can use Photoshop too, of course).
Normally I end up with an image like this:


Each light color has its own layer group which is added to the image. Inside the group, there's a second group with a diffuse map without ambient occlusion. For white lights, leave it as it is. For dark lights, increase the value and contrast. On top of that, there's our baked image, which is multiplied. You can toy with the value curve to tweek the overall intensity of the glow. Finally, the glow mask we had (the one which says where was light comming from in the first method) is added. This group is multiplied to the glow light color.
Multiplying the bake to the diffuse map might look strange, but imagine if we hadn't done it in this image:


That vasudan would have a yellow face and those details over the green part would have been washed away by the light. Of course, you could have told Blender to take into account this diffuse image, but you'd have less control overall and not much of a gain. All that remains to be done is to export the result. You'll probably need to tweak the intensity of the lights (use the group overall opacity) so export to PNG to be able to keep the layers separate (GIMP does strange things to DDS when the source has more than one layer). Once you are done, convert the result to a non-compressed DDS. I know, non-compressed takes more space, but dark compressed images generally have horrible artifacts and this ones are pretty much dark images with subtle gradients.

So that's all... happy baking!
« Last Edit: May 10, 2014, 08:35:47 pm by The Dagger »


Offline Colonol Dekker

  • HLP is my mistress
  • 213
  • Aken Tigh Dekker- you've probably heard me
    • My old squad sub-domain
Re: [GUIDE] Baking glowmaps in Blender
Your guide....

DO MOAR.


Srsly, this is very good.
Campaigns I've added my distinctiveness to-
- Blue Planet: Battle Captains
-Battle of Neptune
-Between the Ashes 2
-Blue planet: Age of Aquarius
-FOTG?
-Inferno R1
-Ribos: The aftermath / -Retreat from Deneb
-Sol: A History
-TBP EACW teaser
-Earth Brakiri war
-TBP Fortune Hunters (I think?)
-TBP Relic
-Trancsend (Possibly?)
-Uncharted Territory
-Vassagos Dirge
-War Machine
(Others lost to the mists of time and no discernible audit trail)

Your friendly Orestes tactical controller.

Secret bomb God.
That one time I got permabanned and got to read who was being bitxhy about me :p....
GO GO DEKKER RANGERSSSS!!!!!!!!!!!!!!!!!
President of the Scooby Doo Model Appreciation Society
The only good Zod is a dead Zod
NEWGROUNDS COMEDY GOLD, UPDATED DAILY
http://badges.steamprofile.com/profile/default/steam/76561198011784807.png


Offline Nyctaeus

  • The Slavic Engineer
  • 212
  • My "FS Ships" folder is 582gb.
    • Minecraft
    • Exile
Re: [GUIDE] Baking glowmaps in Blender
Looks cool! I can't wait to have some time to follow this :D
Exile | Shadow Genesis | Inferno | Series Resurrecta  | DA Profile | P3D Profile

Proud owner of NyctiShipyards. Remember - Nyx will fix it!

All of my assets including models, textures, skyboxes, effects may be used under standard CC BY-NC 4.0 license.


Offline The Dagger

  • 29
  • I like zod ships
Re: [GUIDE] Baking glowmaps in Blender
Wow, that took much more time than what I thought... I hope it'll be usefull though!  :)


Offline Galemp

  • Actual father of Samus
  • 212
  • Ask me about GORT!
    • Steam
    • User page on the FreeSpace Wiki
Re: [GUIDE] Baking glowmaps in Blender
:bump: Can someone Wiki this?
"Anyone can do any amount of work, provided it isn't the work he's supposed to be doing at that moment." -- Robert Benchley

Members I've personally met: RedStreblo, Goober5000, Sandwich, Splinter, Su-tehp, Hippo, CP5670, Terran Emperor, Karajorma, Dekker, McCall, Admiral Wolf, mxlm, RedSniper, Stealth, Black Wolf...


Offline coffeesoft

  • 28
  • Bip Bip
Re: [GUIDE] Baking glowmaps in Blender
Thank you for this great tutorial, I learned a lot  ;)


Offline The Dagger

  • 29
  • I like zod ships
Re: [GUIDE] Baking glowmaps in Blender
I'm glad you found it useful. :)
I'll look into putting it on the wiki over the weekend.