alright here is a brief tutorial on how to work the animation and external weapons code.
it all starts in your modeling program. when building your model plan out what parts you want to be animated and how, or in the case of guns and missiles where to put them.
now for animated parts they MUST be separate models, if they are part of the same mesh it wont work. think of them as setting up turrets on a cap ship...same idea, you have your hull model and the wing gets grouped as a submodel to the hull. each animated subobject must have a unique name as well like "wingmodelA" and "wingmodelB" lets say. in addition the placement of these submodels must be in their inactive or at rest positions for the effect to look right.
the hierarchy should look like this
+Fighter model (or what ever you name the model)
*hull model
+animated wingLeft
-wing model
*Local light ( rename to "H_animated wingLeft")
+animated wingRight
-wing model
*Local light ( rename to "H_animated wingRight")
*Local Light (rename this to "H_fighter model" or what ever you name the model)
Just keep in mind that the animation code is set up to work primarily on a single axes relative to the ships axis so if we want our wing to swing back like an F-14 it will move on the ships Y axis...not its own y axis. all the submodel axis does is tell the game where the submodel will pivot. there is a way around this though if you are looking to achieve an effect like this. that'll be covered later as its a table trick.
Now on to PCS conversion.
assuming your model converted with out a hitch you would set up everything else as normal but with a mandatory stop at the subobjects tab. with that tab active look through the "select subobject" list and find and select your submodel to be animated in this case it'll be "001(animated wingLeft)"
in the subobject field under "Model Name" input the subobject name "animated wingleft" (no quotes), if PCS hasn't already done it for you. the name gets matched to each unique subobject name, so the other wing would be "animated wingRight" set the Movement type to "rotation around axis" and the set the movement axis to Y for the desired swing wing effect. keep in mind submodels can pivot on any of the XYZ Axis when building your model.
Under the properties field this code MUST be entered and altered to match the subobject name
$Special=subsystem
$Name=Animated Wingleft
$Triggered:
(i know what your thinking cuz i thought it too..."this last line doesn't look complete. isn't there supposed to be something after the ":"? the answer.........no)
for "animated wingright"
$Special=subsystem
$Name=Animated WingRight
$Triggered:
when you have concluded you PCS work it time to move on to the table entry...this is where all the good $--t happens.
enter the normal data for all the fields and when you get down to the $subsystems entries fill in the normal weapons, navigation, ect. stuff first. then add an additional entry to the $subsystem list like this
$Subsystem: animated wingLeft 10 ,2 (10 is the total model hitpoint percentage, or damage, and 2...just works)
now for the interesting part.
the wings can be triggered in multiple different ways mainly the activation of primary cannon banks, secondary banks and afterburners for a fighter...capitol ships have their own set of activations. all that can be found here...
http://www.hard-light.net/wiki/index.php/Animation_Codebut lets stick to the fighter for now.
the next lines will must be ordered like this
$Subsystem: animated wingLeft 10 ,2
+untargetable
$animation: triggered
$type: blank
+sub_type: 2
+delay: 0
+relative_angle: 0,0,0
+velocity: 0,0,0
+acceleration: 0,0,0
+time: 0
no we'll run through this in order.
+untargetable
is just that, it prevents you the player from sitting there and cycling through numerous panel and wing subsystems and eliminates the annoyance of having to sift through all that just to find the engine so you can blast it.
$animation: Triggered
tells the game to animate this object when triggered by an event like selecting a gun bank or kicking in the afterburners...pretty much you leave this guy alone.
$Type: blank
the action that triggers the animation. our wing can be triggered when you select a gun bank(substitute blank with Primary_bank), a missile bank ( substitute blank with secondary_bank) or kick in the afterburners (substitute blank with afterburner). take your pick.
+sub_type:
this part only applies to gun or missile selection and can be left out all together if the animation is triggered with the afterburners. sub_type designates which primary or secondary slot activates the animation. lets say you have 3 gun or 3 missile banks...in the table these are numbered 0 through 2, 0 being slot 1, 1 being slot 2, 2 being slot 3. things to keep in mind with this... firing point normals do not move with the animated object, they are slaved to the parent model, so if you have guns that swing out you will have to place the firing point in the position of the gun barrel when it is swung out ready for use...same thing folding missile pods. also it wise to have at lest one gun or missile bank that has no animation tied to it and set the slot as the first slot in PCS, this keeps the animation from triggering right at the start of the mission...it tends to do screwy things if you don't. it should look like this.
primary banks
slot one normal
slot two animated
slot three animated
this is optional though, you can order it anyway you like.
+delay: 0
all this does is set a delay before the animation starts, you probably wont need to worry about this, but if you want to tinker with it, its set up in milliseconds.
+relative_angle: 0,0,0
the three digits represent the movement angle in degrees along the fighters X,Y,Z axis. this part gets tricky and requires some trial and error. you have to think in terms of positive angles and negative angles. i'll try to give some guidelines to work by here. when i'm working on this part i picture the model like im facing in its direction so your right hand side is the right wing looking at it from the rear....trust me this helps. now for the angles and effects.
a positive Z number will roll the part around the length axis of the fighter in a counter clockwise fashion, negative is clockwise,
a positive X will pivot the part around the width axis of the fighter in CW fashion, negative is CCW
positive Y will spin the part like a radar CW , negative CCW
so for our wingRight which will swing back
well set the angle like this, 0,45,0 the get the wing to sweep at a forty five degree angle. the opposite wing would swing back at 0,-45,0
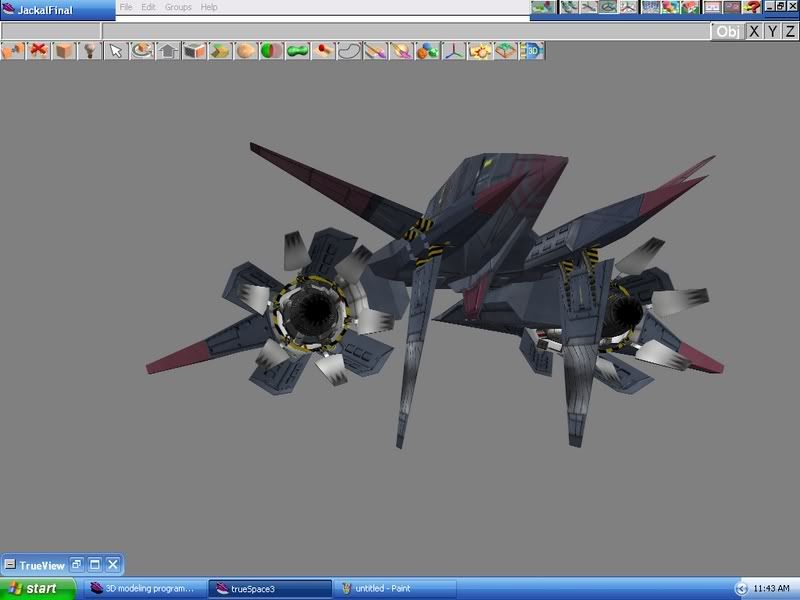
for the afterburner effect in the picture above, that little trick is done by imputing values for two axis to get the angled flaring effect.
lets look at the left engine and the large panel on the bottom right of the wing... the angle input for that is -23,-23,0 so it pivots CCW on X and Y at the same time. like i said though, trial and error to get the angles and effect right so you'll probably be tinkering with this a bit.
+velocity:
this sets the maximum movement speed of the animated object. low value= slow, high value= fast
+acceleration:
this sets how long it takes the animated object to reach its max speed...visually it adds kinda a dampening effect, so it doesn't looks so snappy. i usually use half the value of the max velocity, you dont have to.
+time:
this sets the time in milliseconds before the game considers the animation complete. basically in terms of guns and such it sets a delay from activation to when you can shoot, so if you have gun folding out you can't fire them until they have stopped moving. it prevents things from looking retarded in game. typically i use 2000 as most animations i do are complete in that time (2000 milliseconds = 2 seconds)
all of these fields must be used for EACH unique animated subobject.
Now your probably wondering "oh oh oh, Mr. McCluer, how do i get the gun models and missiles to show on my ship?"
well little billy thats a good question!
(god i love the Simpsons)
First off make a missile or gun, texture it and group it with a local light. be sure to set the axis to coincide with the fighters firing point. ship it off to PCS like you would a fighter. this time around you don't have to do anything in PCS save for adding a thruster glow to a missile (Gatling guns are a little different though... I'll cover that in a second), and save the POF. if you want to have a missile that fires out of an external pod, model the pod, save it as like "missilenamePOD" to make it easier to work with in the table.
now in the table for said missile or gun, fill it out as normal, but add these lines in this order:
$end_multi_text
<<add>> $tech model: VulcanGUN.pof sets the model that will show in the load out menu
$Model File: none only used if you are using modeled projectiles
<<add>> $External Model file: VulcanGUN.pof sets the weapon model that will show on the fighter in game
@Laser Bitmap: thunderstorm
for external missile pods:
$end_multi_text
<<add this>> $tech model: missile.pof sets the model that will show in the load out menu
$Model File: missile.pof only used if you are using modeled projectiles
<<addthis>> $External Model file: missilePOD.pof sets the weapon model that will show on the fighter in game
@Laser Bitmap: none
to get it to show correctly in the load out screen i use these entries below, same deal...MUST be in order.
$Icon: missile
$Anim: missilePOD or missileTECH
guns work the same way...now i dont know why i have to do this....sometimes the load out model will show...when they dont then i add the lines above.
the weapon is set now we just have to modify the fighter table to tell it to show the models
in the fighter table enter these line in this order:
$Allowed PBanks: ( "vulcan" "Subach HL-7" )
$Allowed Dogfight PBanks: ( "vulcan" "Subach HL-7" )
$Default PBanks: ( "vulcan" "Subach HL-7" )
$PBank Capacity: ( 120, 120 )
<<add>> $Show Primary Models: ( yes no ) <------ this tells the game which gun slot 1-3 will show the model
$Allowed SBanks: ( "Rockeye" "missilename" )
$Allowed Dogfight SBanks: ( "Rockeye" "missilename" )
$Default SBanks: ( "Rockeye" "missilename" )
$SBank Capacity: ( 80, 80, 70 )
<<add>> $Show Secondary Models: ( no yes)
thats it
going back to Gatling guns
this requires 2 models....the barrel model and a dummy model usually and untextured mini cube with the barrel model grouped as a submodel.
your hierarchy should look like this
+Gatling
+gattlingbarrel
*(light) H_gattlingbarrel
*mini cube
*(light) H_Gatling
texture it and ship it off to PCS
now bring up the submodels tab and select 001(gattlingbarrel)
model name: Gatling Barrel
Movement type: rotation around axis
movement axis: Z axis
in properties field: $gun_rotation
save the POF
now table out the weapon and add these lines in this order:
$Model File: GattlingBullet.pof <------ only used for modeled projectiles
$External Model File: Gattling.pof
$Submodel Rotation Speed: 130.9 <--- sets how fast the barrels rotate when you pull the trigger
$Submodel Rotation Acceleration: 120 <--- set how quickly the barrels get up to top speed and adds a delaybefore
the gun actually fire after trigger pull
that my friends is every thing i know so far. feel free to correct me or add on to this....hopefully it might get stickied so as not to fade away into the depths of the post list...which would be cool, since i've been working on this post for a while now......

and hopefully it helps you guys churn out some cool ideas!
have fun....good luck
