Huge post alert!
I just want an easier way, because I'm currently subdividing heaps of times, creating the detail, and then I have to try and reduce the poly count be deleting vertices and creating new faces, etc.
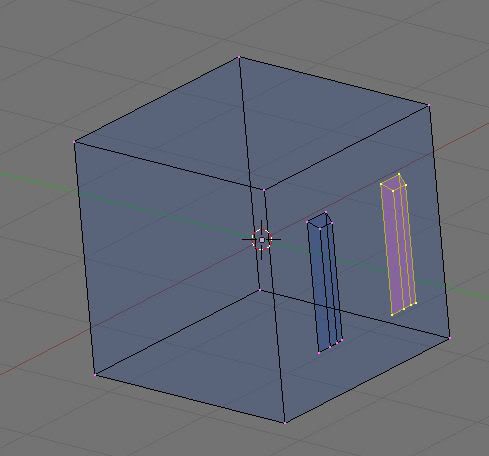
See below to see what I mean - I move the yellow vertices to create the desired shape, then delete uneeded ones to come up with what you see in the pink vertices. Very time consuming.
Umm, owie? :\
Well the answer would be yes there definitely are far far better ways of modelling/adding detail than that. In fact what you have there is essentially the takashi method, which is probably the worst way to go about it I can think of.
I think the key to modelling in Blender is to treat your models as though they were a physical wireframe mesh, but with none of the physical restraints that would imply.

What I mean here is, if you want to move something, you don't apply a modifier, type in new co-ords, or anything like that. You just grab it and move it. The whole modelling toolset is designed around being quick and easy to use (if not to learn
). As such, most tools are context sensitive, and will perform different actions based on certain circumstances.
For example, if you have a face selected, and press E to extrude it, Blender will begin extruding a copy of the face connected to the original and along the original ones normal, resulting in a prism. If you have an edge selected and press E, Blender will begin extruding a copy of the edge, with a face connecting the new edge to the original. Likewise if you have a single vert selected and press E, Blender will begin extruding a copy of the vert, linked to the original by an edge. This feature is especially useful as it allows you to literally build a wire frame (like a 3d dot-to-dot) of what you're making, and then come back and fill it with faces at your leisure. (Try that in Truespace and it will explode!)
This is essentially how I do all my modelling. I start out by making a 2d dot to dot side outline of a ship and then sometimes do the same thing from the top. Then, using combinations of simple functions such as Grab (G), Scale (S), Rotate (R), Extrude (E), Create Face (F), Duplicate (Shift + D), Mirror (M) and subdivide (W>Subdivide) I fill in the 'guts' of the mesh.
I often do this pseudo randomly as in I have only a vague idea of what the overall shape that I'm making needs to have, and just make up details and greebles as I go along. This becomes easier with practice.
As for how to add detail, well there are three main types:

This is roughly the type you are doing at the moment, where the detail is built into the mesh. I usually use this type mainly, as it allows the most complex shapes. I also use it especially for indentations or where an extruded detail goes around an edge, like in the pic.
This is what I usually use for small and fairly simple details like those in the pic. The detail is a part of the same object, but it is not attached to the same hull mesh. It also only barely intersects with the main mesh because intersections are nasty. This detail type is good for adding detail to a surface without really breaking up the surface itself. They often can look like reinforcing bars/ribs, pannels, antennae or whatever.

This is the final type of detail, but it has a specific purpose. As you can see, the 'hull' and the 'detail' are kept as entirely separate objects. The ONLY reason you should do this is if you want the two objects to be recognised as separate sections of the same model by the game. This usually means stuff like turrets or a radar dish, spinning subsystem, detail box, LOD, debris chunk or a destroyable subsystem. The basic rule here is, if your detail does not come under one of the above categories
Also, here's an old post I made that outlines some of Blenders functions and should serve as just a general quick guide. I'll go through it now and update it a bit also:
==================
Mini-Tutorial-Feature-Guide-Thing!======================
What I'll do here is write up an overall guide on how things work with blender. I won't handle all the ins and outs of getting a model textured and into FS just yet - that's a much bigger job. Just stick with learning to build ship meshes for now.

====
Interface Stuff====
Right, when you start up blender, you'll see your start screen with the 3d window being the big main one, and another window with a control panel along the bottom. This can be completely customised to suit whatever viewing needs you have. For example, I have a dual screen setup, and I use my left monitor as ONLY a 3d window, and my right hand screen with my control panel down the bottom and usually the UV mapping window above that.
The active window is whichever one the cursor is hovering over - so you can't for example rotate the 3d view unless your cursor is over that window.
You can scale these windows however you want, and can merge or split them by hovering your mouse over the boarder between them and middle-clicking. You can change what each windows function is by clicking the square drop down icon in the top/bottom left of each window.
Have a quick play with that to see how it works, because you can set up Blender to look like just about any other modelling program. Eg: 3DS Max:

====
View controls====
You can use the mouse, num-pad or a combination of both to control the view. The arrow keys on the num-pad (8, 4, 6 and 2) will snap rotate the view in that direction in set increments. The numbers 7, 1 and 3 will snap the view to top, front and side respectively, and if you want to view from the other side (ie, from the bottom, back or other side), hold ctrl while pressing the number. (Eg, to view from the bottom, you'd hold ctrl and press 7)
The mouse mainly uses the middle mouse button and scroll to control the view. To rotate, just middle click somewhere in the 3d window and drag it around. Holding shift before middle click will pan the view, and ctrl will zoom (though it's easier to use the scroll wheel here).
The final two things to note about views are that blender can display your model from a perspective viewpoint or an orthogonal one. Num-pad 5 toggles this setting, and the "." key will centre and zoom the view on whatever it is you've got selected (works with whole objects, verts, and just about anything else). This function is exceedinly handy since it gives you an excellent level of control over what you're doing.
If you get lost, press Shift+C to reset it to be zoomed out and centered on your whole scene.
====
Modes====
Onto the editing part - Blender has a couple of different 3d window modes to it. Object mode is the default one - and it will allow you to select your various objects in the scene. To edit something in edit mode, you'll first need to have it selected (pink) in object mode. To select objects, just hover the cursor over or near them and right click. To add another thing to your selection press Shift + right click. To remove something hold Ctrl + right click. To select all or no objects in the scene, press A. It will first remove all the currently selected objects from the selection, and if no objects are currently selected it will select everything. This works in edit mode too.
You can find the rest of the modes by clicking the 'Object Mode' dropdown box which is towards the middle of the 3d window's control bar (not the control panel). Of these, edit mode is the only one you should worry about at this stage - and you should also note that to quickly get in and out of edit mode, just press tab.
====
Editing Stuff====
==
Selections==
Ok, Edit mode mainly works on whatever you've selected. Normally, this will be vertices because the wire-frame mesh editing is one of blenders strongest points, but it can quite easily be faces or edges too. To change what type of thing you want to select, you'll find the verts, edges and face select modes towards the right of the 3d windows control bar.
Let's just use verts for now, and we'll only fiddle with the default cube in the scene to demonstrate some of the other functions.
You can select verts/edges/faces in a number of ways, but the most common ones are to 1) press b and click+drag a box around it, 2) hold shift and right click next to all the bits you want (they'll turn yellow when selected), or if you want to select a number of verts that are attached by edges to each other, 3) right click one vert, hold ctrl and tap the num-pad + key, and this will add any verts to the scene that are directly connected to the ones you've already got selected. The rightclick method is by far the fastest and most commonly used method.
==
Editing Functions==
Ok, once you've made your selection (just select the 4 verts that make up one side of the cube for now), you can do just about anything with it. The main things you'll need to know about here though are the Grab, Rotate, Scale and Extrude functions. (each one is activated by tapping the associated first letter of the words, and you click to set.)
So, tap G to grab our selection, and begin moving it around with your mouse. Something to keep in mind here is that when doing it like this, blender will ONLY edit things according to the plane at which the selection is viewed. In other words and in this case, your camera will affect the 'plane' along which your selected object can be moved. Eg, if you press g while in top view, you'll only be able to move the object along the 'ground' plane.
Onto what you can do while you've got your object grabbed - there's a lot. To cancel the move, you can right click at any time and it will snap back to it's original position. (Press Ctrl + Z to Undo, Ctrl + Alt + Z to redo)
To snap it between pre-set grid increments, hold Ctrl.
To perform tiny free movements, hold shift.
To perform tiny snap movements, hold shift and Ctrl.
>>(most importantly)>>To constrain it so it will only move along any one axis, just tap the axis letter (once for the global axis, twice for local, thrice to de-constrain it).
To constrain it to any two axes at a time (ie, just X and Z) press Shift + the axes key that you want to lock (ie, Shift + Y)
To move around one pixel at a time, tap the arrow keys.
To manually type in the new position relative to it's original position just begin typing the new numbers, with tab to switch between axes. The text appears bottom left of the 3D view.
You can do a couple of other things too, but you won't need them for now.
Now - most of the above controls work when in Scale (S) and Rotate (R) too - so it gives you whatever degree of control over your selection that you want.
Extrude (E) is a bit different - it will basically, duplicate your selection, but attach it by edges to the original ones. You should note though that this is context sensitive. What this means is that if you only have one vert selected and press e, it will extrude only that vert, no questions asked. However, if blender detects an edge between two verts, or a face between 3 or 4, it will pop up a little menu when you press e. This will allow you to extrude the piece in exactly the way you wanted - ie, as a face, edges or individual verts. Have a play with this on the cube to see what it does.
The extrude button basically allows you to grow your ships out of whatever you start with, so it's a very important one.
==
Editing Menus==
If you ever get confused, need to find a shortcut or something, press the space bar when over the 3d window. It will pop up a menu that is able to access most of blenders editing functions (the remaining lot are in the 'Weird' W menu), and it will list the shortcuts for each one too.
Also through this menu you can access the add menu, where you can add more primitive shapes at your blender-cursors location. (The blender cursor is that black crosshair with the red and white striped circle through it. You place it by left-clicking somewhere, and centre it by pressing Shift+c) Keep in mind that any objects you create through this menu will be aligned with your view plane again, so it can sometimes get ugly.
And finally, to delete your selection, press X, and it will give you an option for exactly what it is about your selection you want deleted.
====
Final Notes====
Anyways, I think I'll end this monster post there for now since I need to get to uni now, and I think that's probably more than enough information to try and absorb anyway.

Just use it as a kind of introductory function list rather than a sequential tutorial I guess. For a very, very old, but still decent blender tutorial, have a look here:
http://freespace.volitionwatch.com/fs2/mods/fighterguide/step1-1.phpThere's a lot in there that can actually be done via easier means, but it's still got a good overall sequence. Worth a look if you're feeling slightly fried by the above guide.
There is also some great stuff on the blender website, such as some good introductory videos here:
http://blender.org/cms/Getting_started.400.0.htmlIf you're having trouble with or don't understand fully any of the above, just say so and I'll do my best to sort it out.
