Gimpscaping is a word I came up with to go from this
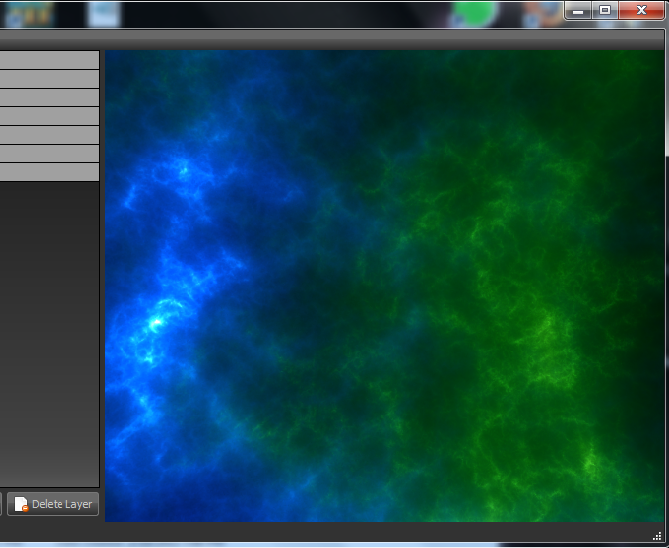
to this
to this
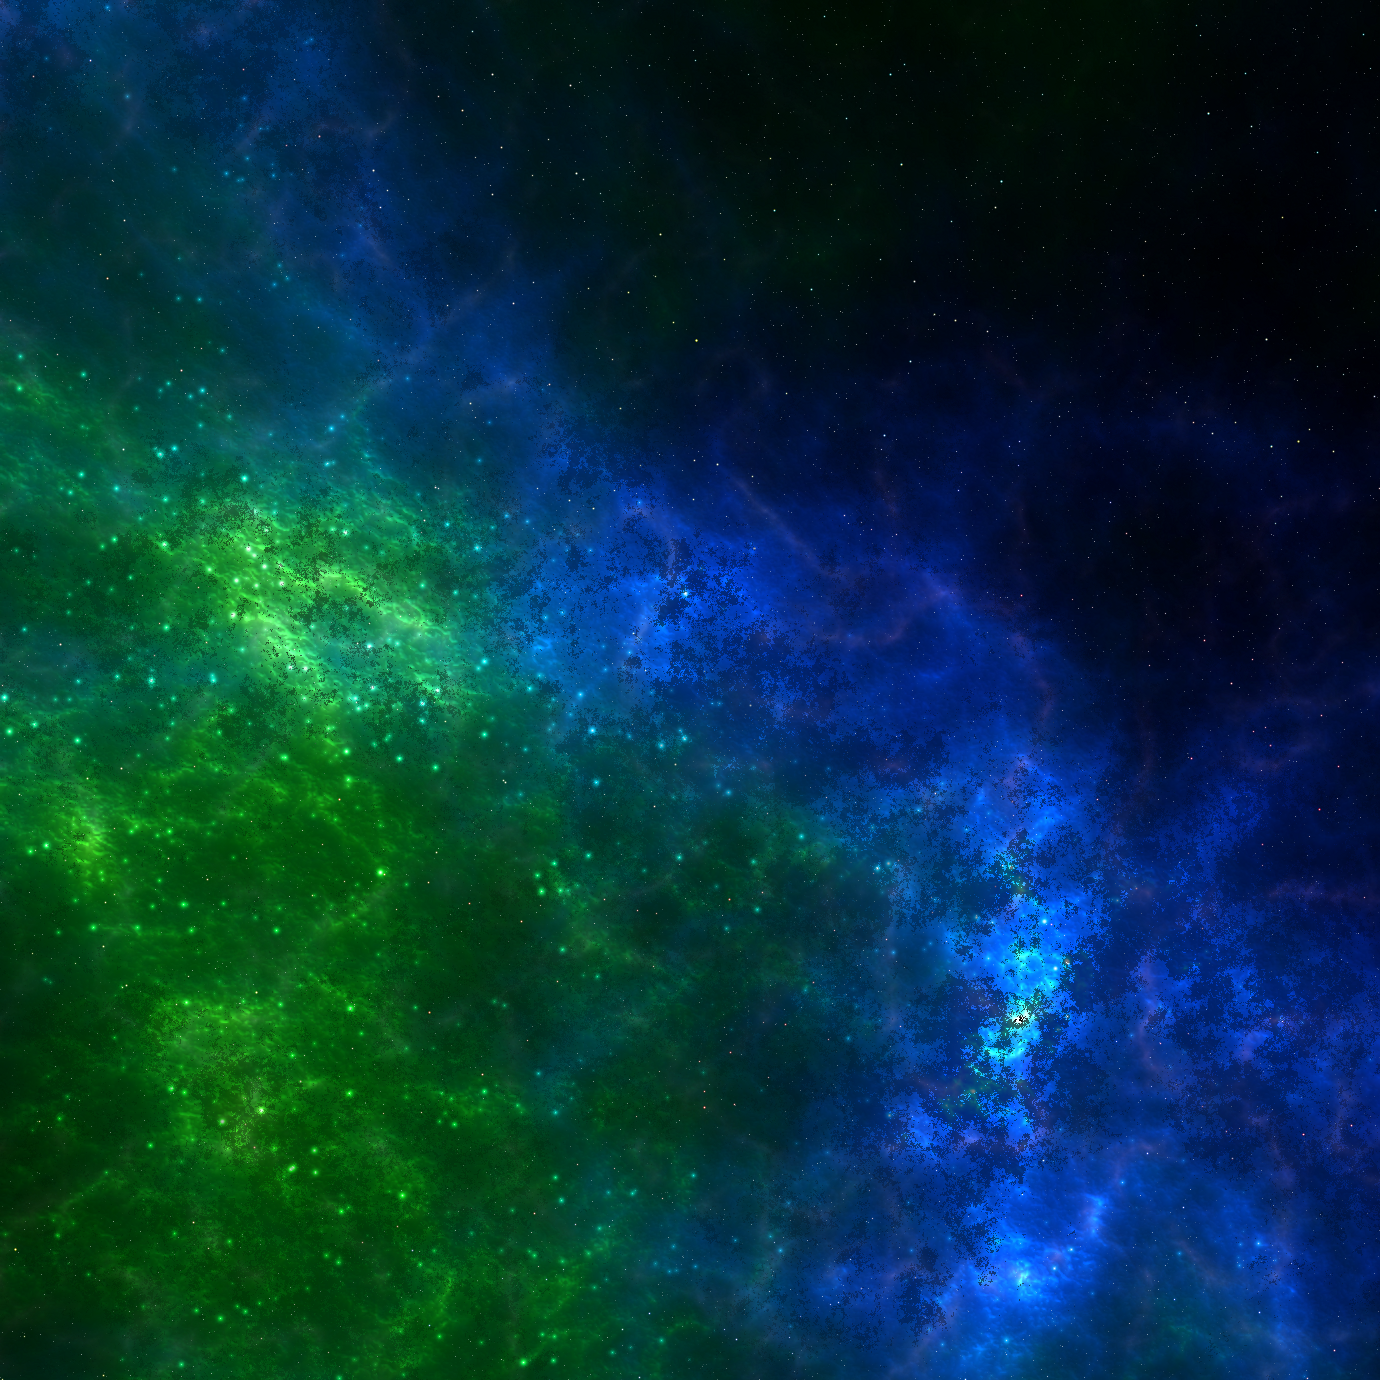
We will do that and it into the game all in one tutorial. That what this is for. It's a long tutorial but really won't take but a couple of hours and is very easy.
ShadowWolf's Skybox Tutorial
from Spacescape to gimp to pof to FS2
ForwardLet me start by saying that the only tutorials I write are for beginners who have little or no knowledge of the programs that they are going to be using. So while going through this tutorial I may be speaking beneath your level of proficiency at any given time. If this annoys you, I apologize in advance. I just think that a tutorial should assume no level of expertise beyond novice.
Set upBefore we start the tutorial proper, there are some things you will need. You will need (in the order used) :
Spacescape --
http://alexcpeterson.com/spacescape Just do a normal install.
Gimp 2.(latest) --
http://www.gimp.org/downloads/ Just do a normal install.
ShadowWolf's Gimpscape scripts --
http://casofwar.hard-light.net/images/Gimpscape.rar extract the contents of this .rar to your User/(Name)/gimp2.x/scripts folder
Paint.net --
http://download-paint-net.com/ Just do a normal install.
pof constructor suite 2 (PCS2) --
http://sourceforge.net/projects/alliance/files/POF%20Constructor%20Suite/ Just do a normal install.
Herra Tohtori's skybox --
generic-skybox-redist.7z Save sky skybox to where ever you want, but remember where you put it.
FreeSpaceFreak's seamless skybox script (supplied with ShadowWolf's scripts)
Fred2 -- Came with Freespace2
Freespace2 -- If you don't have this what the hell are you doing here?
FoldersI set my folders a very specific way. People are creatures of habit, and as such the more we perform a habit, the more natural it feels. So in Pictures I have several folders, but one is called Games. In games I have a folder for each mod or person that I do backgrounds for. Take for instance Scroll of Atankharzim. It has a folder for each system, and each system has four folders in it. So the tree looks like this:
Pictures
Games
Scroll
System1 (can't give the actual name)
DDS
raw
finished
sized
System2 (can't give the actual name)
DDS
raw
finished
sized
System3 (can't give the actual name)
DDS
raw
finished
sized
etc etc through each system. It may seem pretentious to tell you how to set your folder structure, but trust me on this, it will make this tutorial easier to follow.
Step 1 -- SpacescapeThe first thing that you need to know about Spacescape is that I don't know much of anything. I do however know enough to slip through the cracks. Let's get started.
Open Spacescape. In the lower right corner you will see a button called 'New Layer', click it. On the left you should see a new layer appear named 'SpacescapeLayer0'. On the right you should see a black field with stars.
Immediately to the left of the layer name (SpacescapeLayer0), you see an arrow pointing to the right. If you put your cursor on it it turns blue. Click this arrow. This will open your work window for that layer. See fig 1-1.
fig 1-1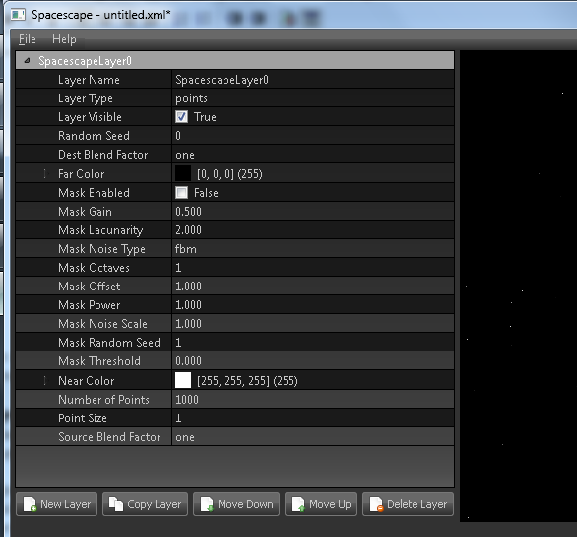
The first thing we need to do is to change its name to blue. To do this, simply click on the entry you want to change. Literally, click 'SpacescapeLayer0', and enter 'Blue', then click the 'Enter' key. You now know how to change entries in Spacescape.
The next item on our list is Layer Type. Currently it is points, we need to change this. Points give us points of light for things like stars, but we won't be creating stars in Spacescape. Click on points and it turns into a light blue bar with a drop menu on the right side. Open the drop menu and select 'noise'. Your viewing window should now be gray.
Let's deal with colors first. Find Outer Color. The entry is a Black box and [0, 0, 0](255) and we need to change this. Clicking on this again turns the entry bar light blue, and on the right of the bar we have a small square. Click this square to bring up our color selection window. See fig 1-2 and make the same entries for Hue, Sat, Val Red Green, and Blue, then click OK.
fig 1-2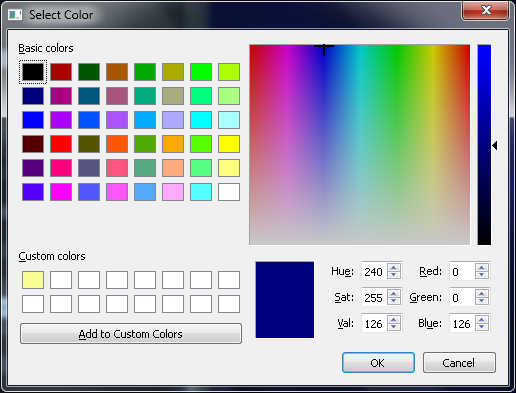
Let's change Inner Color to the match the fig 1-3.
fig 1-3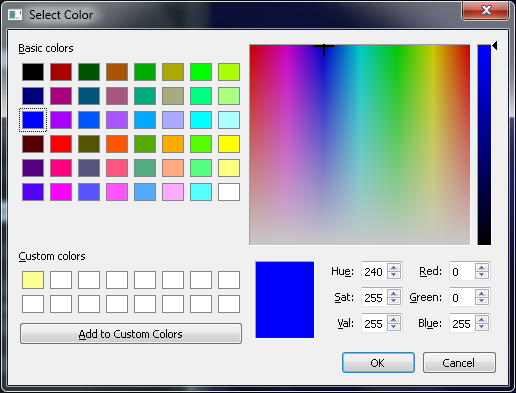
Just a big boring Blue field. Find your Noise Type, and note that the entry is 'fbm,' change this to 'ridged' and we should start seeing nebula shaping up, well brighter in some spots than others anyway.
Next find Random seed and enter 30. The important thing to note here is that if you want a nebula of different color within your base nebula layer, you need to make sure that the random seed numbers are the same.
Let's discuss Gain and Octaves for a moment. Gain defaults to .500 . If you look at your work window you will see Octaves. This is how many passes are made dropping the random seeds over the entire image. Gain is how fast the amplitude changes between each Octave. Set Octaves to 10 and the Gain to .650 .
Power, Noise scale, and Threshold. It may help to think of Power as brightness, Noise Scale as the multiplier for the initial Octave, and Threshold as how far out the nebula extends, the higher the number, the less it extends. Now with this in mind, set Power .400, Noise Scale to .500, and Threshold to .600 .
At the very bottom of our work window is an entry for Source Blend Factor. The current entry for this is 'one', and clicking on 'one' brings a drop menu. Set the Source Blend Factor to 'src_alpha' to prevent the nebula Outter color from filling the whole sky.
If you did everything correctly, your work window should look like fig 1-4.
fig 1-4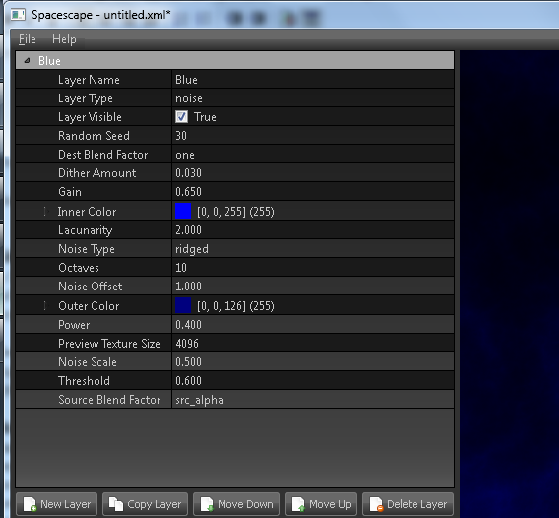
Congratulagtions, you have just completed your first layer in Spacescape.
We aren't done, yet, not by a long shot.
At the very top of the work window is your Title Bar, it says Blue, hit it. Next to your New Layer button, is Copy Layer, hit this. Now hit the little tgriangle next to the word Blue in your title bar, this will collapse the work window for the Blue. Above Blue there should be another layer called Blue copy. Hit the triangle in that title bar to open the work window for that layer.
We are now working in an exact duplicate of Blue, called Blue copy. What this truly is, is a mask which screens the base layer, that is why the nebula in your viewing window got brighter when you copied Blue.
We will only make a few changes to this layer, namely to the colors and the threshold.
Let's change Inner color. You already know how, so simply change the values in it to reflect fig 1-5. Hit OK.
fig 1-5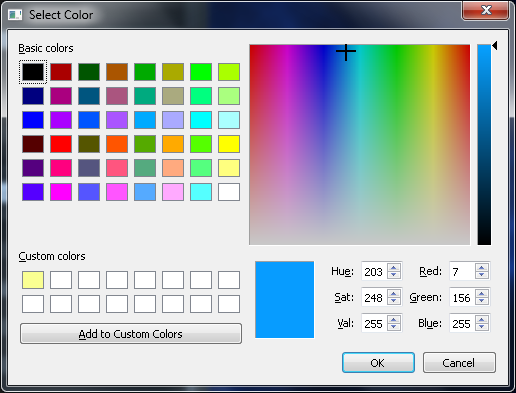
Now change the Outer color to reflect fig 1-6, and hit OK.
fig 1-6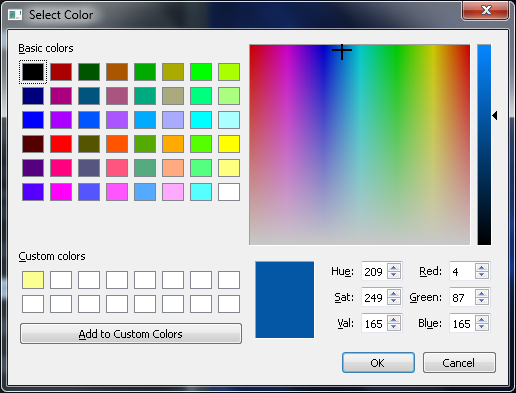
Finally, set your Threshold to .700 .
Pretty simple stuff. The only things you should note are that from here on we will only be modifying new layers. Notice that my Inner colors are always a few shades lighter than my Outer colors, seems to work, so I keep doing it.
Anyway, hit the title bar for this layer, and hit the copy layer button, then collapse the work window for Blue copy and expand the work window for Blue copy copy.
OK, you have the basics of what I am doing, so for this layer I will simply give you the values to input.
First, Inner color. See fig 1-7.
fig 1-7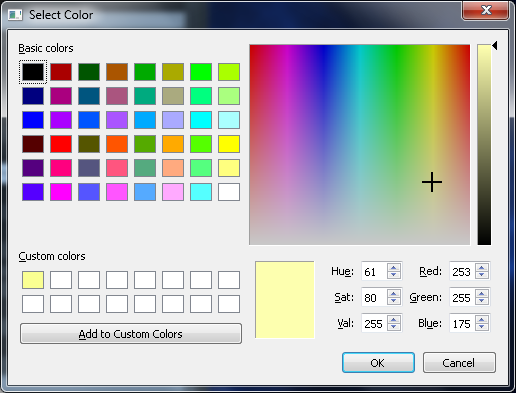
Outer color is fig 1-8
fig 1-8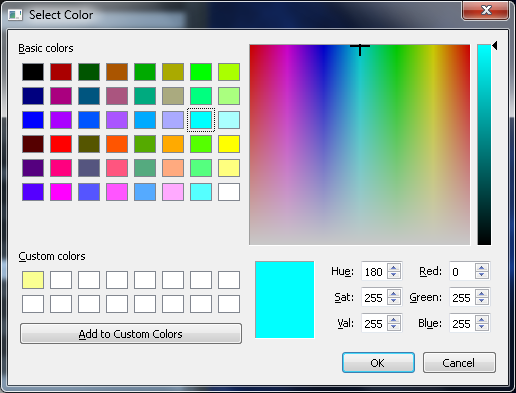
Set the following values.
Gain .800
Power .420
Threshold .875
Click the title bar and copy the layer. Coallapse Blue copy copy, and expand Blue copy copy copy.
For our final Blue layer, Inner color, Outer color, Power and Threshold will be changed. For Inner color refer to fig 1-9.
fig 1-9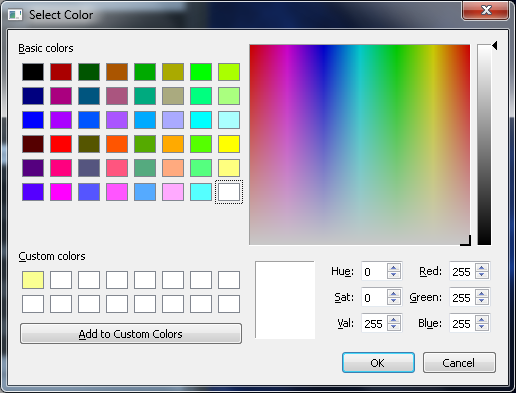
For Outer color, refer to fig 1-10.
fig 1-10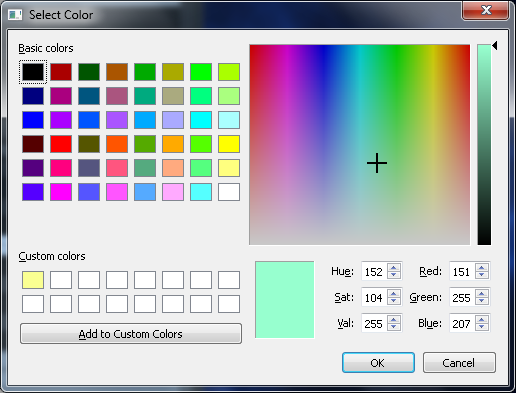
Set Power to .370 and Threshold to .920 .
Usually I only work in two or three layers per color base. But for this one I decided to try a fourth and like the effect.
Now we are going to do our three green layers.
Collapse Blue copy copy copy, and then copy layer, expand the copy and change the Name to Green.
For the green layers I am just going to display my work window for each layer, as well as the color select window for each color.
Inner color is fig 1-11.
fig 1-11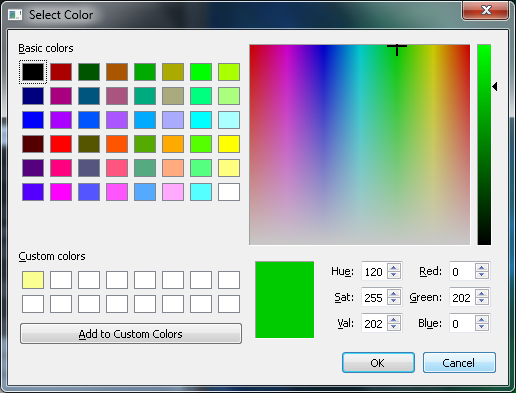
Outer color is fig 1-12.
fig 1-12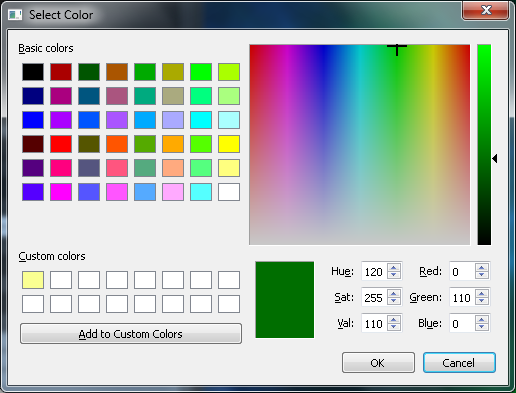
Compare your work window to fig 1-13 and make the necessary adjustments.
fig 1-13
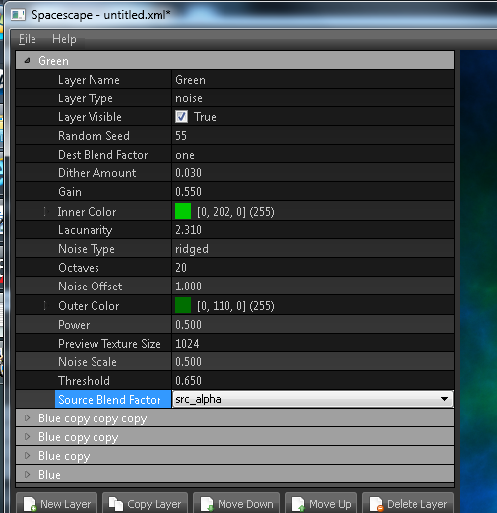
Collpase Green and copy the layer. Expand Green copy.
Fig 1-14 will show you your Inner color.
fig 1-14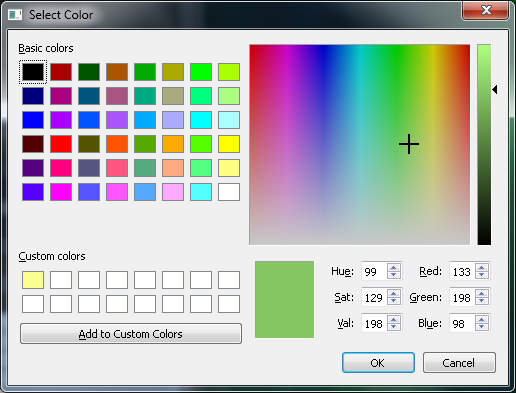
Fig 1-15 will show you your Outer color.
fig 1-15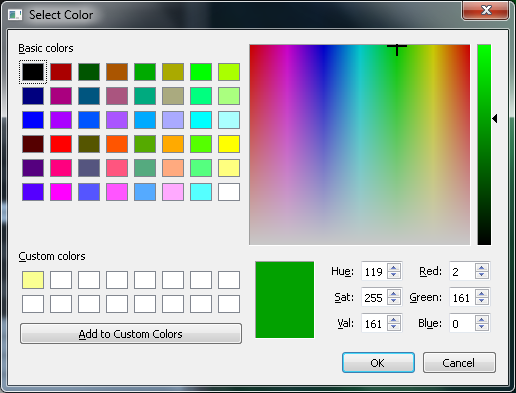
Once again go line by line and make the necessary changes. Refer to fig 1-16.
fig 1-16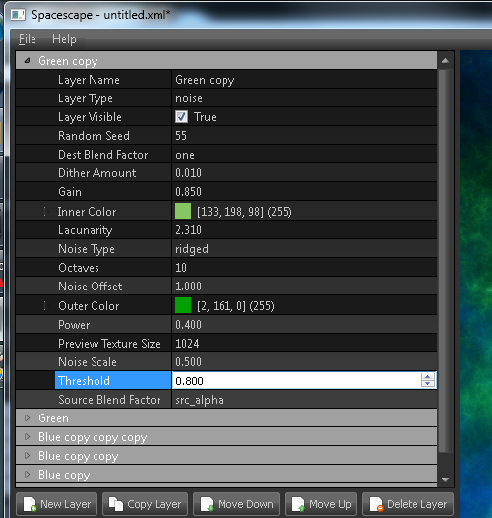
Collapse Green copy and copy the layer. Expand Green copy copy. This is our last layer.
Refer to fig 1-17 for Inner color.
fig 1-17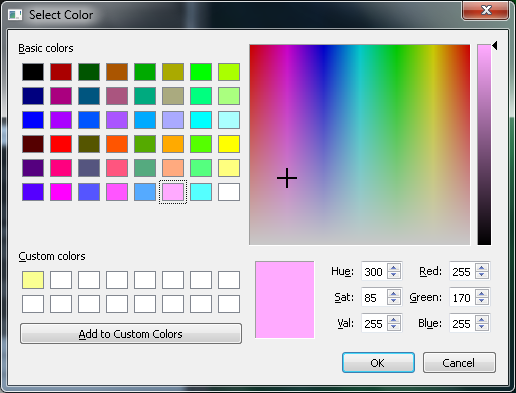
Refer to fig 1-18 for Inner color.
fig 1-18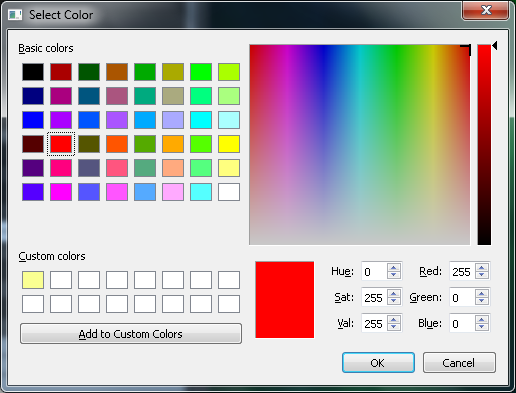
Once again go line by line and make the necessary changes. Refer to fig 1-19.
fig 1-19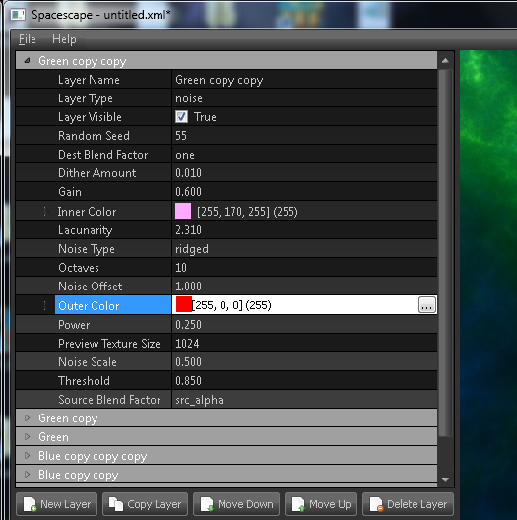
Our background is ready to save and export.
Hit File>Save, and save it to wherever you want.
Once this is done, hit File>Export Skybox.
This is important. The dialogue box will open for exporting, always export as png, never use jpeg. jpeg causes too much loss of quality.
I only work in 2048. The reason I don't use 4096 can be found here:
http://www.hard-light.net/forums/index.php?topic=81057.0Anyway, export as TUT and navigate to your raw folder.
See fig 1-20 for the dialogue box. Notice my 3 entries at the bottom, and my path at the top.
fig 1-20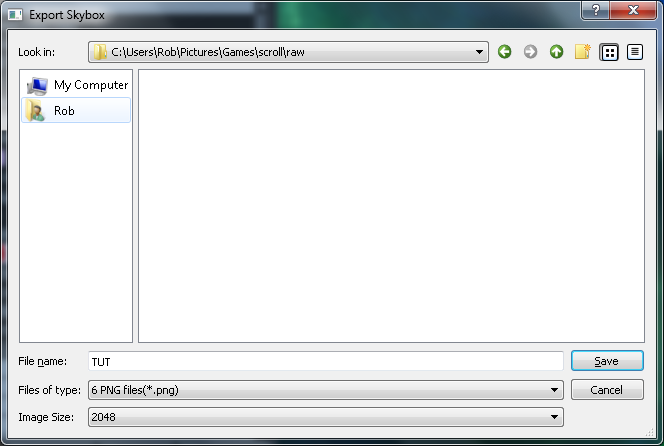
That's it for Spacescape, you can close it.
Now for my secret. All I have done since making my first Spacescape skybox is open an old file in Spacescape, and play around with things. I have only started from sratch one time.
Step 2 -- GimpIn Gimp, we will be doing almost everything else. I use paint.net to save in DDS format, and that's about it. The nice thing is, nearly everything we need to do in Gimp has been scripted by either myself or Freespacefreak.
There are basically 5 things that we will be doing in Gimp. The starfield, a nebula top, bright stars in the nebula, dark nebula, and putting them into a format for seamless skybox use.
StarfieldStarfields are so easy to create that each mod gets its own. Although we will be working everything else in 2048 in Gimp (2040 after the first nebula script), the starfields look so much better when made in 4096. We could make them in 4096 and then scale them down, but most of the stars are only 1 pixel and as such they cannot be scaled down, so they are dimmed. This option will not do. The script that we are about to use instead creates the starfield in 4096, then steals a 2040^2 piece for use in the rest of what we do in Gimp.
Time to decide how many stars you want. I had hoped to find a way to make brightness and contrast interactive in the script, but it is a part of Gimp itself, and cannot be altered, so this is how we have to change it.
Use Notepad and navigate into your Users>Name>gimp2.x>scripts folder, and double click the one called 'starfield.'
Once it opens, scroll your way down the script until you see:
;;;;;;;;;;;;;;;;;;;;;;;;;;;;;;;;;;;;;;;;;;;;;;;;;;;;;;;;;;;;;;;;;;;;;;;;
;;;;;;;;;;;;;;;;;;;;;;;;;;;;;;;;;;;;;;;;;;;;;;;;;;;;;;;;;;;;;;;;;;;;;;;;
;ADJUST ME!!!
;adjust brightness and contrast to backCopy
(gimp-brightness-contrast backCopy
60 110)
;;;;;;;;;;;;;;;;;;;;;;;;;;;;;;;;;;;;;;;;;;;;;;;;;;;;;;;;;;;;;;;;;;;;;;;;
;;;;;;;;;;;;;;;;;;;;;;;;;;;;;;;;;;;;;;;;;;;;;;;;;;;;;;;;;;;;;;;;;;;;;;;;
I marked it with all of those semi-colons so that it would be easy to find. In this copy I marked the number to be changed in
red. It says 60 by default. The lower the number the more sparse your field will be, I generally stay between 50 and 70. 50 is fairly sparse, and 70 is fairly busy, it is up to you. For now though, leave it at 60. Save and close.
Now open Gimp.
Now hit File>New. The new file dialogue box will appear. Make our image 4096 x 4096. See fig 2-1.
fig 2-1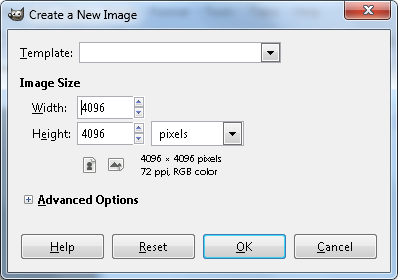
Hit OK.
Once your new image has been created it is just a blank white field.
Now go to Filters>Skybox>Starfield.
The script now does all of the work. Wait for it to finish, and then set your zoom to 100% for a good look. Some stars are larger than others, and the large stars have color. This gives your field some depth. Save as 'starfield.png' in the folder that corresponds to the mod or person. For me this is 'Scroll'.
BEFORE SAVING.
If you do not like the number of stars, open the starfield script with notepad, and make your adjustment. Then save it. In Gimp, go to Filters/Script-Fu/Refresh Scripts. Then close the image window in Gimp, as oposed to the toolbox. Then simply create a new 4096^2 image and run the script again. After a few tries, you'll figure out where you like it.Once you have the starfield saved close the image window, but not the toolbox.
It's that easy to create a good starfield. You only have to do this once per mod, of course you can create a custom starfield for each star system in the mod if you wish, but there is no need. From this point on, this tutorial will operate under the assumption that you have only created one starfield.
NebtopThis is the heart of the things, not so much this phase, but the nebula work. We are going to create a top for the nebula that will appear as small light lines strewn about. It adds a nice effect.
Navigate to your folder called raw, and open TUT_back6.png
Once it is open, hit Filters>Skybox>Nebula Top.
When the script completes the work, look at your toolbox, it has all of your layers listed. Click on Nebtopcolor, and in the image window you will see the product. Now delete NebtopColor, Neb3, and Background Copy.
Also, click on that little eye next to Nebtop. This will disable it, and you will no longer see what the script just did.
See fig 2-2
fig 2-2 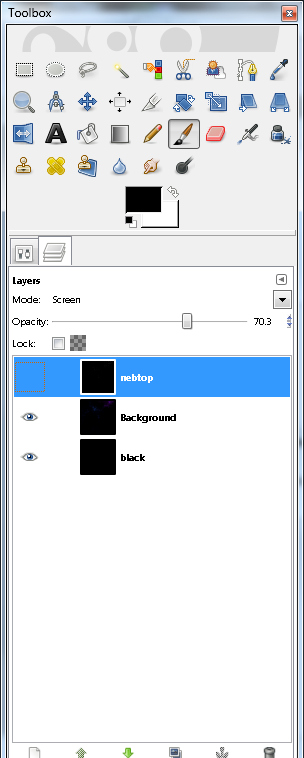
This next step is very important, in your toolbox click on Background so that it is highlighted in blue. If you don't do this, things will get screwy in the next step.
BrightstarsWith that done we are going to make some bright stars in the nebula. This is adjusted in the same way that we adjusted the number of stars in the starfield. Lower number being less brightstars in the nebula. To adjust this number, you would open Brightstars using notepad (found in the scripts folder), and marked the same as the one in the starfield script.
NOTE:
If you do not like the number of bright stars and decide to adjust them in the script, once you hit Filters>Script-Fu>Refresh Scripts, delete all layers except Background, Black, and Nebtop. Then run Brightstars script again.Delete the following Layers:
Luminosity, Bright1, Bright2, Bright3, and Bright4.
NOTE:
Before doing anything else, you should zoom in and look at all four of the edges of the image. If you have a brightstar touching any edge, it needs to be gotten rid of. Disable any layers above Bright, and then paint the offensive star in black. Failure here will create a seam issue.Enable Nebtop by clicking the little eye next to it in the toolbox, and once again click on Background. Your layer view should look like this:
fig 2-3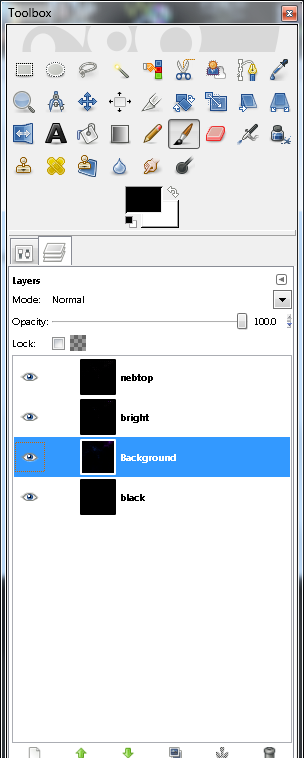 Dark Nebula
Dark Nebula are the dark clouds which block out everything. We will now create these by going to Filters>Skybox>Dark Neb.
When the script stops running, you will have a dialogue box in front of you wanting to discuss bump map.
See fig 2-4.
fig 2-4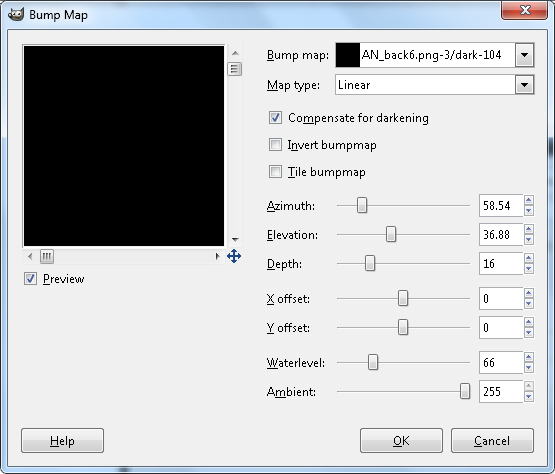
You will notice that I have input different values for Azimuth, Elevation, Depth, Waterlevel, and Ambient. After much playing, I found this combination to work best for our purposes here, so I always use them. Input these values but DO NOT hit OK.
At the top of the box you will see a down arrow that opens a drop menu, hit this, and you will see the layers listed, choose the one that corresponds with your background. It is the one that is highlighted in fig 2-5.
fig 2-5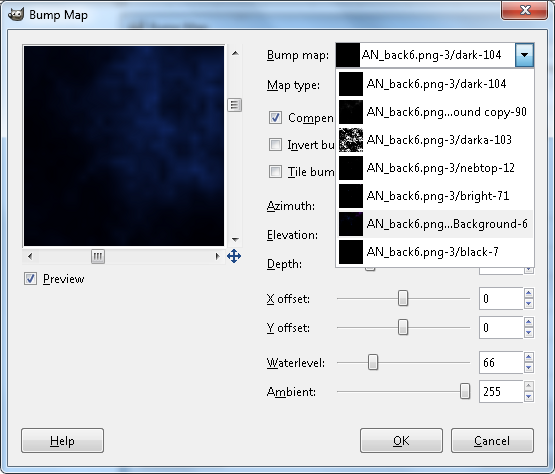
now hit ok.
StarfieldRemember the starfield that you created? Time to use it. First, in your toolbox, click on the layer called Background Copy. Then hit File>Open as layers, and navigate to your starfield, and open it. Once this is open, set its mode to screen . If you look above all of your layers, you will see a slider for Opacity. Above this you will see 'Mode: Normal.' Directly across from 'Mode: Normal' you see a drop menu arrow, simply click this arrow and choose Screen.
It is important to note here that the starfield must be beneath the layer called 'dark'. If it is above that layer, then the dark nebula will not block any stars, and will destroy any depth that would have been created.
Once this is done, hit File>Save as and navigate your way into the folder called 'finished'. Save the file using the current name. Then hit save as again, and go up to the parent folder (Scroll for me), and save the file but not as a png, save as an xcf file.
You have now completed one side of your skybox .
Repeat Step 2 of this tutorial for each of the other 5 sides, using your same starfield in each one. Then you will have all of your sides done and be ready to make sure that they are seamless.
Step 3 -- SeamlessWe once had a seam issue at the joint of two sides of the skybox. Herra Tohtori fixed this and Freespacefreak wrote a script to make it easier. I'm just going to walk you through an easy set up before using that script.
We need to take all of our images and put them into a grid that looks like fig 3-1.
fig 3-1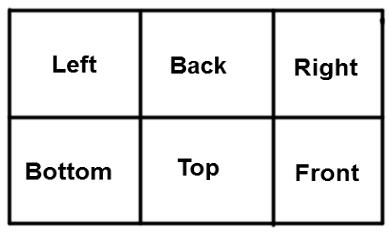
The easiest way that I have found to do this is to first make a grid with 4 of our images instead of six. Our four images in this grid will be Left, Back, Bottom, and Top.
So let's make this happen. First, create a new image by selecting File>New. Make this image 4080 x 4080. See fig 3-2, and hit OK.
fig 3-2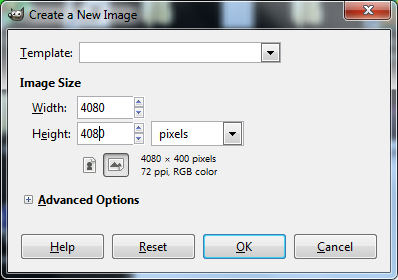
This will become our base image. Zoom in to 50%, and take the Verticle slider all the way to the top. Then take the Horizontal slider all the way to the left. See fig 3-3. The sliders are marked in
RED and the zoom is marked in
BLUE.
fig 3-3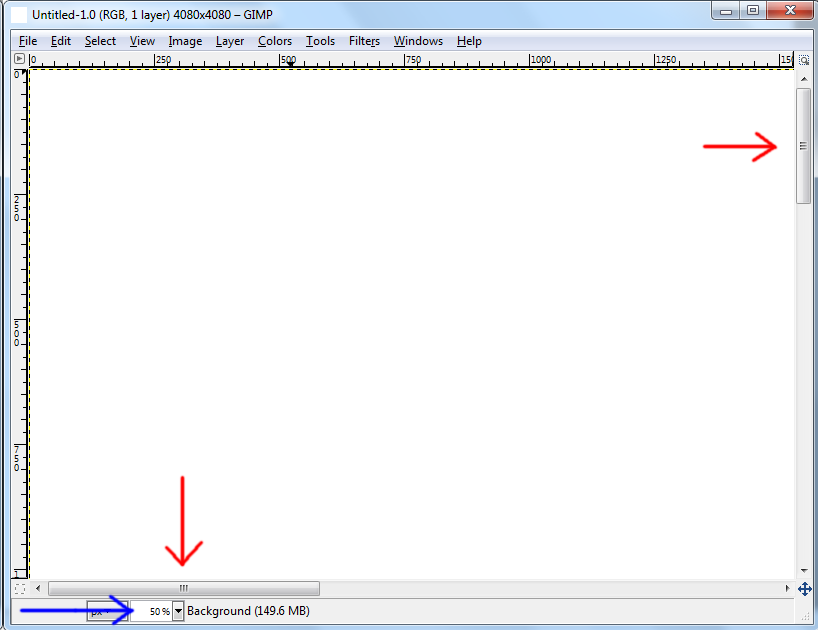
Now select File>Open and navigate into your 'finished' folder, open TUT_left2. It will open in a different window, so click it's window, then select Edit>Copy. You can close TUT_left2. Switching again to our window with the 4080 x 4080 image, hit ctrl v and then hit ctrl h. This will Paste and Anchor the copied image (TUT_left2).
Now move your Horizontal slider all the way to the right, and open TUT_back6. Copy it and then close it. Once again switch to your base image (4080 x 4080) and hit ctrl v and then ctrl h.
Move Verticle slider all the way down. Open, copy and close TUT_top3. Then hit ctrl v to paste and ctrl h to anchor it.
Move the Horizontal slider all the way to left. Open,, copy and close TUT_bottom4. Then hit ctrl v to paste and ctrl h to anchor it.
That is all four of the images that we are putting into this grid. Now copy this image.
Open a new image 6120 x 4080, by hitting File>New.
Once this image opens move its Verticle slider all the way up, and its Horizontal slider all the way to the left. The zoom in to 50%.
Hit ctrl v to paste and ctrl h to anchor. Then close the 4080 x 4080. No need to save it, we are done with it.
Move the Horizontal slider all the way to the right.
Now open TUT_right1, copy it and close it. Then in our new base image (6120 x 4080), hit ctrl v to paste and ctrl h to anchor to image.
Move the Verticle slider all the way to the bottom for our last image placement.
Open, copy, and close TUT_front5. Then in our new base image (6120 x 4080), hit ctrl v to paste and ctrl h to anchor to image.
The image is now ready to be made seamless. Select Filters>Skybox>Envmap-to-Skybox. Don't forget to thank FSF for the script. A dialogue box will open. for save in, navigate to your 'sized' folder. For File Name, just put TUT. See fig 3-4 and hit ok.
fig 3-4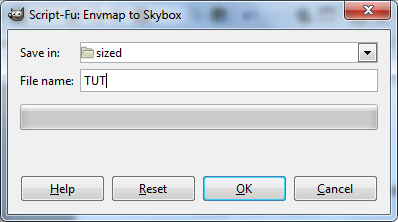
The script will now do its work, and will automatically save the images in png format in the 'sized' folder.
We are done with Gimp.
Step 4 -- DDSOpen Paint.net. Select File>Open, and navigate your way to your 'sized' folder. You can draw a box which highlights all six of the images there and then hit open.
Hit File>Save as and navigate from 'sized' to 'DDS'. Be sure to set 'Save as Type' to DDS. Hit ok.
A dialogue box will appear. On the reight you will see a drop menu called settings, select this and then select DXT5 (Interpolated Alpha). This will now be the default everytime you save as a DDS. Hit OK. It will save as a DDS in the correct folder. You can close this image and then repeat for the next 5 images. Then you are done with DDS.
Step 5 -- POFThis where we put our maps and skybox into the game. Simple process really.
Navigate to your DDS folder and copy everything in it. Then navigate to the maps folder of the mod you are working with, and paste the maps.
Now open PCS2. Hit File>Open and navigate to wherever you saved Herra Tohtori's seamless skybox to open it.
Down the left side of PCS2 you will see a nnumber of items, the only one that concerned with is Textures. Click on the little box with the square in it to expand it. You now see six Textures listed.
The top Texture is the right side, click it. On the right side you see two buttons, Load and Save. Beneath them is the word 'Textures'. Beneath that word is a drop menu and a text box. In the text box type TUT_rit, and hit enter.
Go back to the left side, and hit second texture. Replace it with TUT_top.
Replace the rest in the follwoing order:
TUT_bak
TUT_frn
TUT_btm
TUT_lft.
Then click File>Save, and when the dialogue box opens name it Skybox Tutorial, and navigate to your mod's model folder, save it there.
Close PCS we are done with it.
Step 6 -- FREDYou probably know how to do this, but for those who don't, I will show you.
Open Fred.
There will be one ship on the grid, click on it, once this si done refer to fig 6-1, to see which button to click on next.
fig 6-1
Once you click on that button a dialogue box will open, in the box simply type 'Alpha', and hit ok.
Then select Editors>Background. Refer to figure 6-2 to see where to click in the new dialogue box that opens.
fig 6-2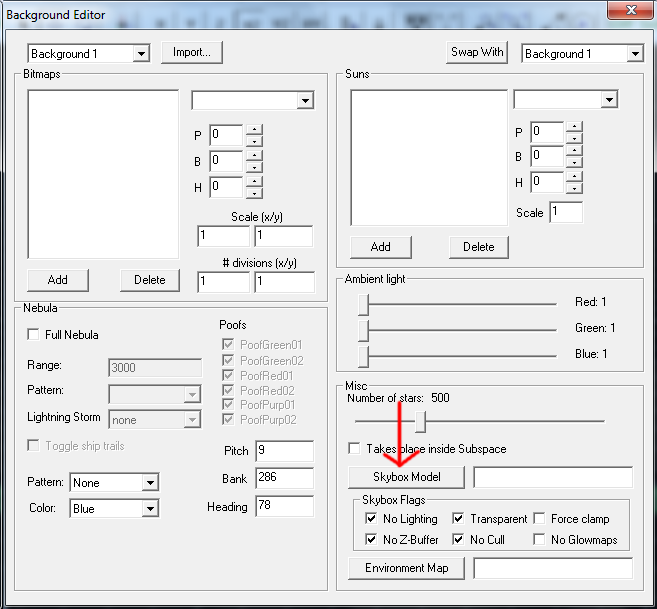
Once you click the Skybox Model button, you will be able to navigate into your mod's Models folder, and when therem double Skybox Tutorial. The model name should appear in the textbox next to the button you just clicked.
Close this dialogue box by hitting the red X in the right corner.
Select File>Save as, and save it as whatever you want. Go into Freespace 2 amd selct your mission, see your skybox, take screens and show it off.
Tutorial By ShadowWolf
Gimpscape scripts written by ShadowWolf
Envmap-to-Skybox script written by Freespacefreak
Skybox model and all around inventiveness and Godlike powers by Herra Tohtori.
