Author Topic: SF Basilisk WIP  (Read 48704 times)

0 Members and 1 Guest are viewing this topic.

Offline castor

  • 29
    • http://www.ffighters.co.uk./home/
Sexcellent!


Offline Pred the Penguin

  • 210
  • muahahaha...
    • EaWPR
That looks really really pretty.

Hope it gets a good texture. ^_^


Offline Aardwolf

  • 211
  • Posts: 16,384
So I notice Blender doesn't import smoothing info very well...

Also, that nobody but me seems to notice when models don't have proper smoothing, anyway.


Offline blowfish

  • 211
  • Join the cult of KILL MY ROUTER!!!!!!!!!!1
So I notice Blender doesn't import smoothing info very well...

No, it doesn't...


Offline BrotherBryon

  • 29
  • Resident Lurker
I didn't like how the pollies were not uniform on either side of the ship, so I went back to the Sketch-up model and cut it in half. I then imported the half into blender, duplicated, mirrored and then joined the two halves together. Now the pollies are uniform through out the model. Still trying to get smoothing to work but not having any luck. I found a decent UV tutorial but I'm a little stumped at how to approach it. I don't quite know where to place my seams. Any guidance would be most appreciated.
Holy Crap. SHIVANS! Tours


Offline Water

  • 210
I can have a look at it if you want. Should be able to get you on track.


Offline Aardwolf

  • 211
  • Posts: 16,384
The primaries (I think) look nice, I may have to steal the idea for that from you if I ever do anything that could use that sort (if that's alright).


Offline BrotherBryon

  • 29
  • Resident Lurker
Ok, I placed the blender, 3ds, and Sketch-Up files in the zip file.

EDIT: There is a correction between the sketch-up versions, After splitting the model in half I noticed my middle divider lines were a little off and made corrections in the fighter10s variant prior to exporting to 3ds.

@ Aardwolf; Steal away, most of the primaries design was based off the original textures any way.


[attachment deleted by ninja]
« Last Edit: May 05, 2009, 09:04:03 pm by BrotherBryon »
Holy Crap. SHIVANS! Tours


Offline Aardwolf

  • 211
  • Posts: 16,384
Really? I'll have to look at that again, in that case...


Offline Water

  • 210
Basics
Divide/unwrap the model into pieces with the least amount of empty texture space. For normal mapping it's best if each face has its own space, but for better texture space usage mirror it and stack the identical missile tubes.

This fighter is basically one big greeblefest, not really ideal for learning to unwrap.

First step
Delete the new mirrored half. - you only want to unwrap one half. Add a mirror modifier (F9 Edit > Modifiers) - but don't apply it.

Change unwrapper to Conformal (F9 Edit > UV Calculations) Conformal - mechanical,  Angular - organic

Object mode - Hit n - With the fighter selected, the little window shows that x is negative. Ctrl A to fix that, otherwise the unwrap will be backwards.

In edit mode remove doubles and Ctrl N to recalculate the normals.

Change the right window to UV Image editor.
View > View Properties > Stretch > Area  -- what this does is give you feedback on how much distortion is present in a uv island. At the end, stuff will be mostly dark blue.

Useful tools
Select linked flat faces - CTRL-Shift-Alt-f   -Useful for selecting flat areas - flat panels and recessed areas etc. 179 = flat,  then Ctrl-E > region to loop (convert selected poly region to just edge outline) then you can mark seam

Edit F9 > Mesh tools more > loop select -- change to tag edges (seam) -- Allows you to Alt-right click to place a seam

Useful keys
Ctrl numpad +   (Add to selection)
H - hide  -- Alt H - unhide
Shift H - hide every thing other than selected.
Ctrl I - Invert selection
Ctrl L - select linked - useful for selecting a seamed area etc.
bb - Mouse wheel to adjust brush size - Select using a brush
Alt Z - Swap between textured and solid
Shift v (with face selected) Aligns view to face - useful for unwrap > project from view
In the UV window is a Sync UV and mesh selection button - Any face you select in either window is selected - very useful on occasion.

The more uv pieces a model ends up with, the greater the need for a 3D painting app. In other words it gets a bit hard to track the pieces in 2D paint. (Photoshop/Gimp) So if you have a drawing tablet more parts are less of a problem, for a mouse and Photoshop, less parts are better.

Temporary unwrap
Shader F5 > World > Amb Occ > set samples to 5 (faster)
Unwrap > Smart projections
In UV window > Image > new 1024x1024
Ctrl Alt B > Ambient Occlusion.

In textured view, have a good look at the model and figure what parts belong together.

I'll try and cover some of the actual unwrapping tomorrow.

 
As a textureur, I'd rather have more UV surface detail to work with than less. Why? because then I have better control over the texture and the less mirroring the better.
Actually, it's not a good idea to mirror anything if that can be helped. I use a texture that is called Panelfinder to find surfaces in 3D and also helps in adding panel lines etc. Just apply the panelfinder on the 3D model and view to see where the surface is. I'll post an example later tonight.
Got Shivans? The SOC Ezechiel is the schnitzel! Don't leave base without it.


Offline Water

  • 210
As a textureur, I'd rather have more UV surface detail to work with than less. Why? because then I have better control over the texture and the less mirroring the better.
Mirroring is used for exactly that reason, to provide maximum texture area. With the larger texture sizes, the amount of wasted texture space increases dramatically, thats even with lots of care.


Offline BrotherBryon

  • 29
  • Resident Lurker
Thanks for the help Water, any and all tips are most appreciated. Real life is going to prevent me from working on this again until some time next week but hopefully I can make some progress then.
Holy Crap. SHIVANS! Tours


Offline Water

  • 210
Some of this is a  bit generic.


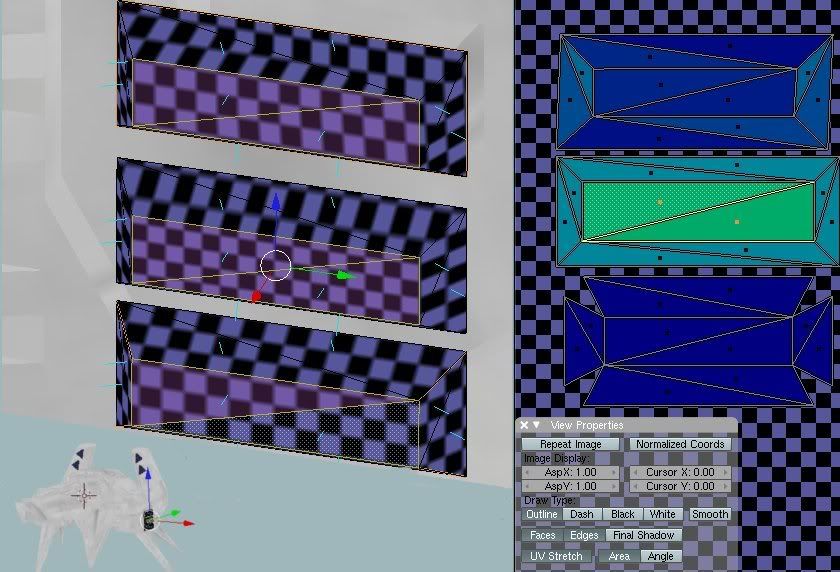
The top one was just unwrap. Notice the distortion through the upper face. On the right you can see the distortion represented in the colours.

The second one, Select the middle face and press shift-V. This will align the view to the face. Then unwrap the faces using project from view.  Distortion is there but won't be too noticeable.

The last one involves 4 small seams in the corners before unwrap and has the least distortion.

Recesses

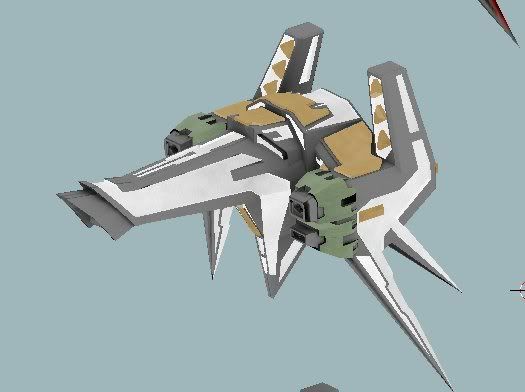
Two basic ways of doing recesses. It depends on the texturing as to which one to use. For this one the glow will reflect off the inside edge, so it would be better to keep the bits together (bottom right) With some of the more complex shapes the edge pieces could end up overlapping. You have to judge if it will be noticeable and worth some extra effort. Keep in mind the smaller greebles on some ships are effectively invisible at most distances

This piece projects out but you can treat it like a recess.


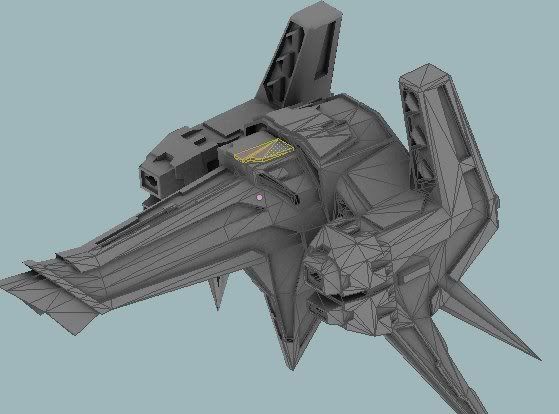
So start by breaking the job into smaller parts.

The idea is to unwrap a piece. If it looks messed up or too distorted add seams till it looks ok. Rotate it so it will be orientated in a way that makes sense for when you paint it. Then move it outside the square. All the glowing red stuff should end up in one pile. Try to keep similar stuff together. Now because you are unwrapping piece by piece, most bits will end up scaled wrong. From time to time you can select all the previous unwrapped pieces and use UV's > Average Island scales. This will bring the selected stuff back into proportion.

Don't even think of laying out the pieces until you have unwrapped everything.

Tips

Having a check pattern can help. Create some different sized check patterns and pick something in a colour that is easy to work with. If you can't get your head around the orientation of the unwrapped pieces, swap to a texture with the letter G.


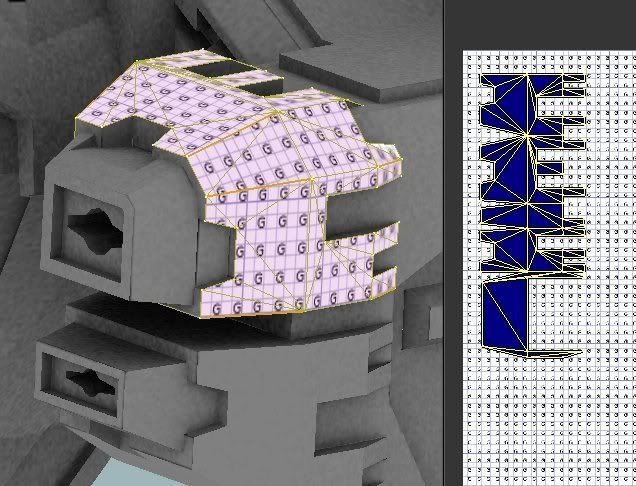
Although the unwrapped shape looks strange, when painting you will always recognize where the part belongs.
(there are some small errors in this part of the mesh that will prevent a single click unwrap of this shape.) Switch to face mode to spot them.

Pinning

When the first one was unwrapped the distortion was due to the projecting piece. In the second one it was unwrapped with that piece excluded. Pin it by pressing P in the UV window (If you press P in the 3d window you will be thinking wtf, Blender has crashed - just hit ESC, as you are in Blender Game Mode)

Now select the excluded faces and unwrap. The pinned pieces won't move. ALT p will clear the pinned uv vertices.

See how you go with that lot.


Offline IceyJones

  • Maker of Cutscenes
  • 28
  • ATM busy
    • IceyJones.de
When you finished this great model incl. mapped textures, pls send me a PN. I will need this ;)


Offline Cobra

  • 212
  • Snake on a Cain
    • Skype
    • Steam
    • Twitter
You want him to send you the Philippine Navy? :nervous:
To consider the Earth as the only populated world in infinite space is as absurd as to assert that in an entire field of millet, only one grain will grow. - Metrodorus of Chios
I wept. Mysterious forces beyond my ken had reached into my beautiful mission and energized its pilots with inhuman bomb-firing abilities. I could only imagine the GTVA warriors giving a mighty KIAAIIIIIII shout as they worked their triggers, their biceps bulging with sinew after years of Ivan Drago-esque steroid therapy and weight training. - General Battuta


Offline IceyJones

  • Maker of Cutscenes
  • 28
  • ATM busy
    • IceyJones.de
nah......just a "personal nessage"....ähhh....Message ;)

 
Here is the Panelfinder Template I mentioned. Apologies for being late on this.


Just copy the .jpg file and save it as whatever file you use for your programs. It can be used as a layer in your templates for the textures as well.

Got Shivans? The SOC Ezechiel is the schnitzel! Don't leave base without it.


Offline Aardwolf

  • 211
  • Posts: 16,384
I wonder, can Blender do the sort of baked lighting that Brand-X was using on one of his ISD wip's back in the day, a sort of combination of ambient occlusion and diffuse reflected emission? I know that was MAX, but it'd be cool if Blender has that feature too, I've never checked.

Edit to make this post at all relevant in this thread: I imagine if you used animated glows combined with that sort of effect you could get some awesome results.

 
really good job! Can't wait! (But dont rush)